Accept Payments on your Android App
Before you begin
You should create a free Paystack account which will give you access to your unique test key to test your integration.
Accepting payments in your Android app is easier than ever before with Paystack! With our Android SDK, you can easily start accepting card payments from your customers. With the SDK you can:
- Customize the payment form to fit your brand
- Securely process payment
In this tutorial, we'll be building a simple food ordering app that shows how to use Paystack SDK to accept payments in an android app. The app consists of two activities as shown below:

I grabbed the picture of the burger from Pexels. You can get it here or use a picture of a meal you'd prefer to eat. To keep my app's size lean, I opted to use the smaller version of the image.
Android Proficiency
This guide assumes you understand the fundamentals of Android development. The aim of this guide is to show you how to integrate payment in your android app via Paystack.
Project Setup
This guide was written using Android Studio 4.1.1, Android Gradle plugin 4.1.0, and Gradle 6.5. Earlier versions might behave differently but the end result should be the same. You should also ensure you have a stable internet connection to install the project dependencies. The app code is available in Java and Kotlin.
Show me the code
If you are only interested in integrating the SDK you can skip to the Install SDK section.
Create Food Ordering App
Let's open up Android Studio and create a new project with the following parameters:
| Attribute | Value |
|---|---|
| Project Template | Empty activity |
| Application Name | Food Checkout |
| Package name | com.yourdomain.appname |
| Language | Java or Kotlin |
| Minimum SDK | API 21: Android 5.0 (Lollipop) |
Click the Finish button to confirm the project configuration and wait for the project dependencies to install completely. There are a couple of assets we'll be using for our application, so it's best we set them up before proceeding with other parts of the app.
Add the Burger Image
If you haven't downloaded the burger image yet, you should navigate to Pexels and download it. I used the Free Download drop-down to select a custom size (320 x 480) for my image. When the image downloads successfully, rename it to burger.jpg and drag to your application's drawable folder:

Update the Color File
The default colors created for us by Android Studio don't match our app's design. Open the colors.xml file in the values folder and update it with the following code:
1<?xml version="1.0" encoding="utf-8"?>2<resources xmlns:tools="http://schemas.android.com/tools">3 <color name="white">#FFFFFFFF</color>4 <color name="silver_400">#CBC9C9</color>5 <color name="azac_500">#DEB334</color>6 <color name="cod_gray_900">#171516</color>7 // this is used to modify the default border color of a text input8 <color name="mtrl_textinput_default_box_stroke_color" tools:override="true">#CBC9C9</color>9</resources>
Update the App's Theme
Since we've updated our color.xml file, our theme.xml will have a couple of errors because we have removed the previous color references it was using. Before updating our theme, we should delete the night version of the theme as we'll not be making use of it. We can then update our theme.xml file as follows:
1<resources xmlns:tools="http://schemas.android.com/tools">2 <!-- Base application theme. -->3 <style name="Theme.FoodCheckout" parent="Theme.MaterialComponents.DayNight.NoActionBar">4 <!-- Primary brand color. -->5 <item name="colorPrimary">@color/cod_gray_900</item>6<!-- <item name="colorPrimaryVariant">@color/purple_700</item>-->7 <item name="colorPrimaryVariant">#191919</item>8 <item name="colorOnPrimary">@color/white</item>9 <!-- Secondary brand color. -->10 <item name="colorSecondary">@color/azac_500</item>11 <item name="colorSecondaryVariant">@color/azac_500</item>12 <item name="colorOnSecondary">@color/cod_gray_900</item>13 <!-- Status bar color. -->14 <item name="android:statusBarColor" tools:targetApi="l">?attr/colorPrimaryVariant</item>15 </style>16</resources>
Create a File for all Dimensions
All text sizes, margins and dimensions used in this app were referenced from a dimens.xml file. To create one, right click the values folder, then New > Values Resource File:
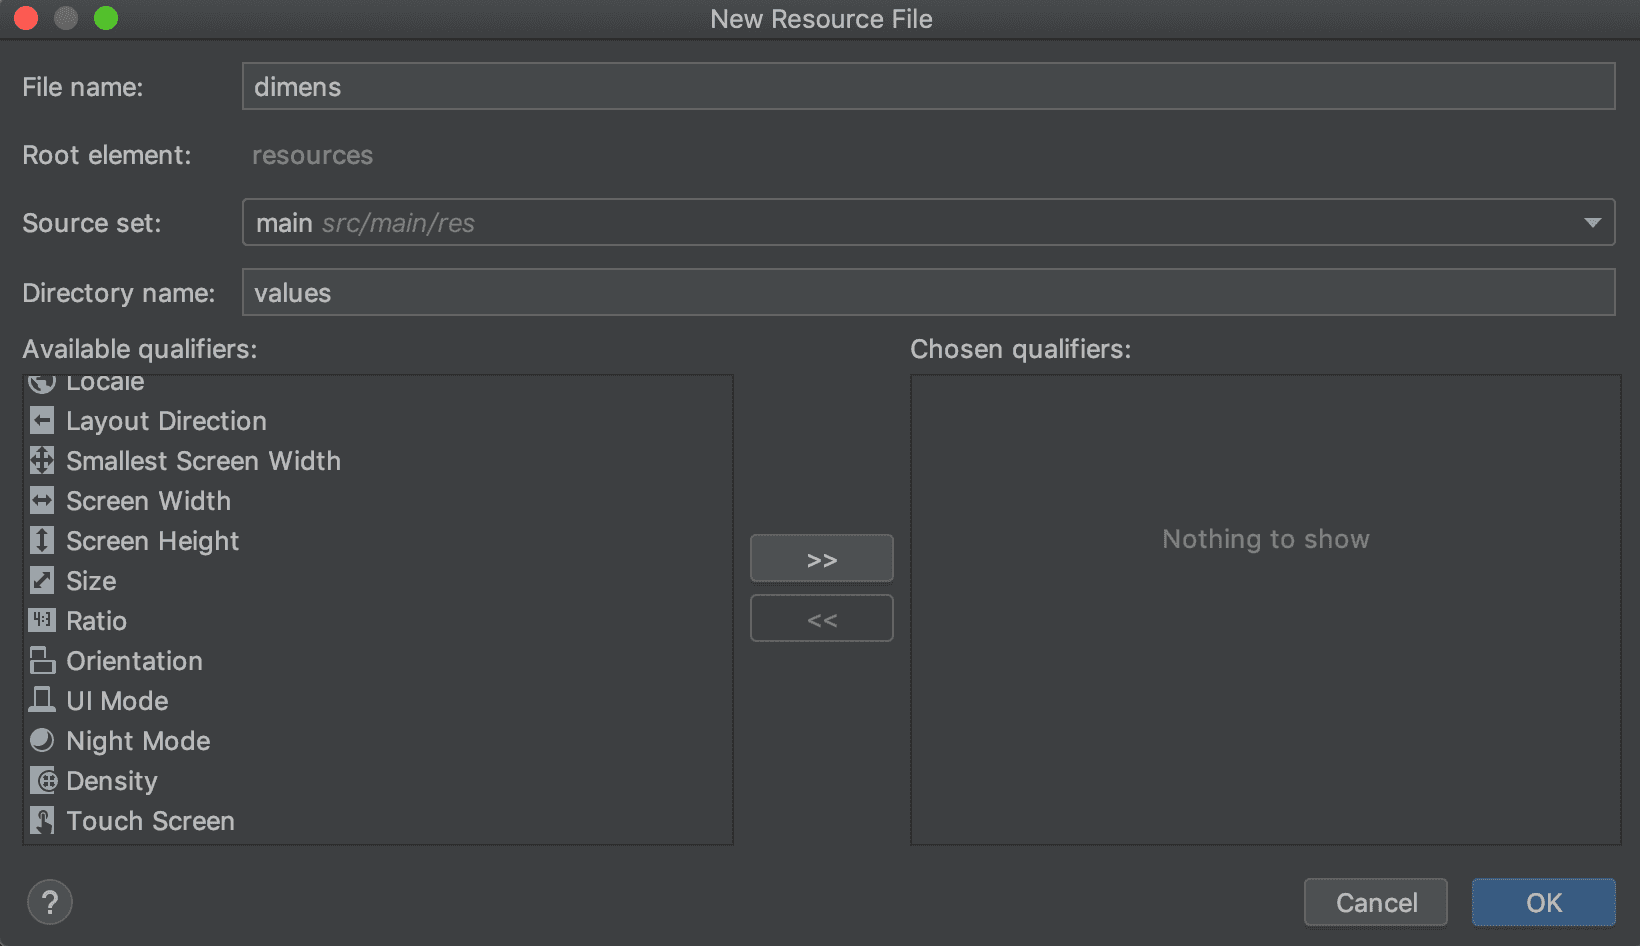
Click OK to confirm the file creation and add the following inside the newly created file:
1<?xml version="1.0" encoding="utf-8"?>2<resources>3 <dimen name="text_14">14sp</dimen>4 <dimen name="text_16">16sp</dimen>5 <dimen name="text_18">18sp</dimen>6 <dimen name="text_24">24sp</dimen>7 <dimen name="text_32">32sp</dimen>8 <dimen name="dimen_8">8dp</dimen>9 <dimen name="dimen_10">10dp</dimen>10 <dimen name="dimen_16">16dp</dimen>11 <dimen name="dimen_20">20dp</dimen>12 <dimen name="dimen_24">24dp</dimen>13 <dimen name="dimen_32">32dp</dimen>14 <dimen name="image_height">420dp</dimen>15</resources>
Add String Resource
Finally, let's add all the string resources we'll be using in the app. Open your strings.xml file and add the following:
1<resources>2 <string name="app_name">Food Checkout</string>3 <string name="meal_name">Cheese Burger</string>4 <string name="meal_description">5 A properly seasoned patty topped with a slice of fresh tomato, cheese and lettuce enclosed in a6 fluffy bun. It’s accompanied with a side of fries with a sweet and spicy dip.7 </string>8 <!-- Hardcoding the price is for demo purpose only.9 You shouldn't do this in prod -->10 <string name="meal_price">Pay ₦4,000</string>11 <string name="payment_prompt">Card details</string>12 <string name="card_number">Card Number</string>13 <string name="card_expiry">Card Expiry</string>14 <string name="card_cvv">CVV</string>15</resources>
Implement App UI
At this point we've successfully:
- Created the base application
- Added all of our required assets
We can now go ahead to implement the app's interfaces.
Create Food Detail Interface
We'll be using MainActivity and activity_main.xml for the food details interface. Open the activity_main.xml file and add this snippet into it:
1<?xml version="1.0" encoding="utf-8"?>2<androidx.constraintlayout.widget.ConstraintLayout xmlns:android="http://schemas.android.com/apk/res/android"3 xmlns:app="http://schemas.android.com/apk/res-auto"4 xmlns:tools="http://schemas.android.com/tools"5 android:layout_width="match_parent"6 android:layout_height="match_parent"7 android:background="@color/cod_gray_900"8 tools:context=".MainActivity">910 <ImageView11 android:id="@+id/iv_meal_image"12 android:layout_width="match_parent"13 android:layout_height="@dimen/image_height"14 android:contentDescription="@string/meal_name"15 android:scaleType="centerCrop"16 android:src="@drawable/burger"17 app:layout_constraintLeft_toLeftOf="parent"18 app:layout_constraintRight_toRightOf="parent"19 app:layout_constraintTop_toTopOf="parent" />2021 <TextView22 android:id="@+id/iv_meal_name"23 android:layout_width="wrap_content"24 android:layout_height="wrap_content"25 android:layout_marginStart="20dp"26 android:layout_marginTop="@dimen/dimen_20"27 android:layout_marginEnd="@dimen/dimen_20"28 android:text="@string/meal_name"29 android:textColor="@color/azac_500"30 android:textSize="@dimen/text_24"31 app:layout_constraintLeft_toLeftOf="parent"32 app:layout_constraintTop_toBottomOf="@id/iv_meal_image" />3334 <TextView35 android:id="@+id/iv_meal_description"36 android:layout_width="match_parent"37 android:layout_height="wrap_content"38 android:layout_marginTop="@dimen/dimen_10"39 android:layout_marginStart="@dimen/dimen_20"40 android:layout_marginEnd="@dimen/dimen_20"41 android:text="@string/meal_description"42 android:textColor="@color/white"43 android:textSize="@dimen/text_14"44 android:lineSpacingMultiplier="1.2"45 app:layout_constraintLeft_toLeftOf="parent"46 app:layout_constraintRight_toRightOf="parent"47 app:layout_constraintTop_toBottomOf="@id/iv_meal_name" />4849 <Button50 android:id="@+id/btn_checkout"51 android:layout_width="match_parent"52 android:layout_height="wrap_content"53 android:layout_marginStart="@dimen/dimen_20"54 android:layout_marginEnd="@dimen/dimen_20"55 android:layout_marginBottom="@dimen/dimen_20"56 android:backgroundTint="@color/azac_500"57 android:textColor="@color/cod_gray_900"58 android:text="@string/meal_price"59 android:textStyle="bold"60 app:layout_constraintBottom_toBottomOf="parent"61 app:layout_constraintLeft_toLeftOf="parent"62 app:layout_constraintRight_toRightOf="parent" />6364</androidx.constraintlayout.widget.ConstraintLayout>
This interface consists of four elements:
- ImageView: This is used to render out sumptuous burger image
- TextView: This is used to render the meal name and description respectively.
- Button: This is used to confirm the order and redirect to the checkout activity.
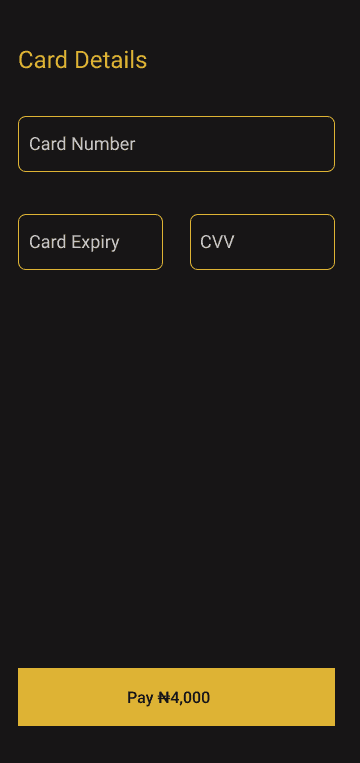
Create the Checkout Form
We'll create a new activity to hold the checkout form. Navigate to File > New > Activity > Empty Activity and set the configuration as follow:
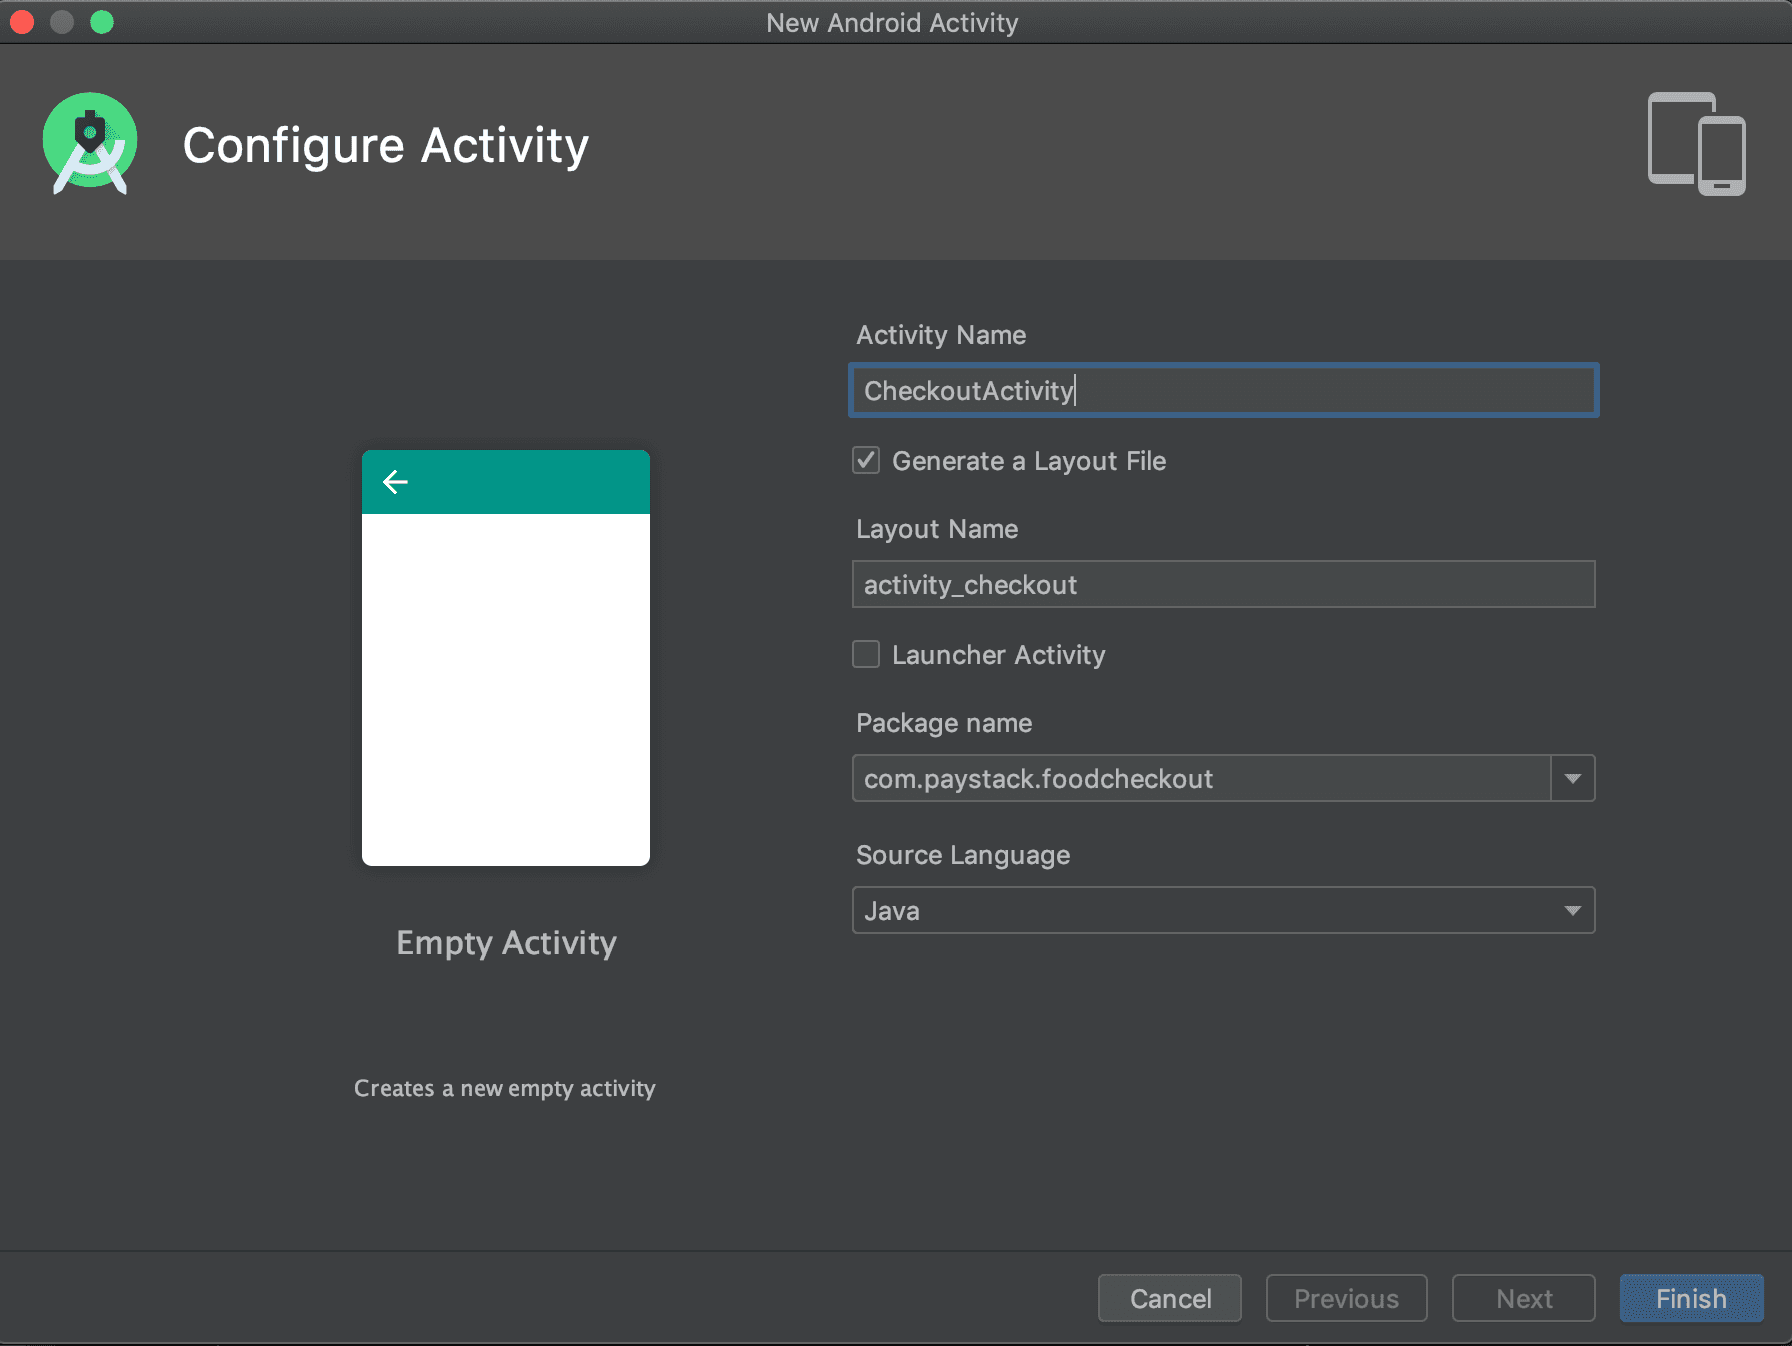
Click Finish and wait till the Gradle sync is completed. Two new files will be generated — CheckoutActivity and activity_checkout.xml. Open the activity_checkout.xml file and add the following:
1<?xml version="1.0" encoding="utf-8"?>2<androidx.constraintlayout.widget.ConstraintLayout xmlns:android="http://schemas.android.com/apk/res/android"3 xmlns:app="http://schemas.android.com/apk/res-auto"4 xmlns:tools="http://schemas.android.com/tools"5 android:layout_width="match_parent"6 android:layout_height="match_parent"7 android:background="@color/cod_gray_900"8 android:padding="16dp"9 tools:context=".CheckoutActivity">1011 <TextView12 android:id="@+id/tv_payment_prompt"13 android:layout_width="match_parent"14 android:layout_height="wrap_content"15 app:layout_constraintTop_toTopOf="parent"16 app:layout_constraintLeft_toLeftOf="parent"17 app:layout_constraintRight_toRightOf="parent"18 android:layout_marginTop="@dimen/dimen_32"19 android:layout_marginStart="@dimen/dimen_16"20 android:layout_marginEnd="@dimen/dimen_16"21 android:text="@string/payment_prompt"22 android:textSize="@dimen/text_24"23 android:textColor="@color/azac_500" />2425 <com.google.android.material.textfield.TextInputLayout26 android:id="@+id/til_card_number"27 android:layout_width="match_parent"28 android:layout_height="wrap_content"29 android:layout_marginStart="@dimen/dimen_16"30 android:layout_marginTop="@dimen/dimen_32"31 android:layout_marginEnd="@dimen/dimen_16"32 android:hint="@string/card_number"33 android:textColorHint="@color/silver_400"34 app:layout_constraintEnd_toEndOf="parent"35 app:layout_constraintStart_toStartOf="parent"36 app:layout_constraintTop_toBottomOf="@id/tv_payment_prompt"37 app:hintTextColor="@color/silver_400"38 app:boxStrokeColor="@color/azac_500"39 style="@style/Widget.MaterialComponents.TextInputLayout.OutlinedBox">4041 <com.google.android.material.textfield.TextInputEditText42 android:layout_width="match_parent"43 android:layout_height="match_parent"44 android:inputType="text"45 android:textColor="@color/white">4647 </com.google.android.material.textfield.TextInputEditText>4849 </com.google.android.material.textfield.TextInputLayout>5051 <com.google.android.material.textfield.TextInputLayout52 android:id="@+id/til_card_expiry"53 android:layout_width="0dp"54 android:layout_height="wrap_content"55 android:layout_marginStart="@dimen/dimen_16"56 android:layout_marginTop="@dimen/dimen_32"57 android:layout_marginEnd="@dimen/dimen_16"58 android:hint="@string/card_expiry"59 android:textColorHint="@color/silver_400"60 app:layout_constraintTop_toBottomOf="@id/til_card_number"61 app:layout_constraintLeft_toLeftOf="parent"62 app:layout_constraintRight_toLeftOf="@id/til_card_cvv"63 app:boxStrokeColor="@color/azac_500"64 app:hintTextColor="@color/silver_400"65 style="@style/Widget.MaterialComponents.TextInputLayout.OutlinedBox">6667 <com.google.android.material.textfield.TextInputEditText68 android:layout_width="match_parent"69 android:layout_height="match_parent"70 android:inputType="text"71 android:textColor="@color/white">7273 </com.google.android.material.textfield.TextInputEditText>7475 </com.google.android.material.textfield.TextInputLayout>7677 <com.google.android.material.textfield.TextInputLayout78 android:id="@+id/til_card_cvv"79 android:layout_width="0dp"80 android:layout_height="wrap_content"81 android:layout_marginStart="@dimen/dimen_16"82 android:layout_marginTop="@dimen/dimen_32"83 android:layout_marginEnd="@dimen/dimen_16"84 android:textColorHint="@color/silver_400"85 app:layout_constraintTop_toBottomOf="@id/til_card_number"86 app:layout_constraintRight_toRightOf="parent"87 app:layout_constraintLeft_toRightOf="@id/til_card_expiry"88 app:boxStrokeColor="@color/azac_500"89 app:hintTextColor="@color/silver_400"90 style="@style/Widget.MaterialComponents.TextInputLayout.OutlinedBox">9192 <com.google.android.material.textfield.TextInputEditText93 android:layout_width="match_parent"94 android:layout_height="match_parent"95 android:inputType="text"96 android:hint="@string/card_cvv"97 android:textColor="@color/white">9899 </com.google.android.material.textfield.TextInputEditText>100101 </com.google.android.material.textfield.TextInputLayout>102103 <Button104 android:id="@+id/btn_make_payment"105 android:layout_width="match_parent"106 android:layout_height="wrap_content"107 android:layout_marginStart="@dimen/dimen_16"108 android:layout_marginEnd="@dimen/dimen_16"109 android:layout_marginBottom="@dimen/dimen_16"110 android:backgroundTint="@color/azac_500"111 android:textColor="@color/cod_gray_900"112 android:text="@string/meal_price"113 android:textStyle="bold"114 app:layout_constraintBottom_toBottomOf="parent"115 app:layout_constraintLeft_toLeftOf="parent"116 app:layout_constraintRight_toRightOf="parent" />117118</androidx.constraintlayout.widget.ConstraintLayout>
This interface consists of five elements:
- TextView: This is used to give a short description of the page.
- TextInputLayout: This is used to collect the card details
- Button: This is used to initiate the payment request
Link Both Activities
Let's create an intent to link the food details activity to the checkout activity. Open the MainActivity file and create the intent:
- Java
- Kotlin
1@Override2protected void onCreate(Bundle savedInstanceState) {3 // ...45 int price = 4000;6 Button mCheckout = findViewById(R.id.btn_checkout);78 mCheckout.setOnClickListener(v -> {9 Intent intent = new Intent(MainActivity.this, CheckoutActivity.class);10 intent.putExtra(getString(R.string.meal_name), price);11 startActivity(intent);12 });13}14
You can now run the app to make sure everything is working fine.
Install SDK
We've successfully created our food ordering app! Now let's integrate payment into the app. The Paystack SDK for Android can only be used for accepting card payment at this time. Other payment channels can be initialized from your backend and completed on the mobile app.
Add Dependency
The Paystack SDK provide methods to manipulate and securely send card details.
Warning
Do not save users' card details on your database except you are PCI-DSS compliant. If you need to charge the customer's card subsequently, kindly refer to the recurring payment section.
To add the dependency, open your app's build.gradle and add the following line:
1dependencies {2 // .... other dependencies3 implementation 'co.paystack.android:paystack:3.1.2'4}
Note
Version 3.1.2 is the latest version of the SDK as of the time of this writing. You can either check the SDK repo for the latest version or use the Android Studio auto-update feature if you have an older version installed.
Enable Java 8 Support
Our SDK makes use of some Java 8 features so it's necessary to enable it on your project. Add the following in your app's build.gradle:
1android {2 // ... Other configuration code3 compileOptions {4 sourceCompatibility JavaVersion.VERSION_1_85 targetCompatibility JavaVersion.VERSION_1_86 }78 // or this for kotlin9 kotlinOptions {10 jvmTarget = '1.8'11 }12}
Since we've made some changes in our build.gradle file, we'll need to rebuild the app to install the required dependencies and update the project's configuration.
Add Public Key
You need integration keys to initiate a payment request to Paystack. Copy your public key from your Paystack dashboard and add it to the project:
1# Specifies the JVM arguments used for the daemon process.2# The setting is particularly useful for tweaking memory settings.3org.gradle.jvmargs=-Xmx2048m -Dfile.encoding=UTF-84# AndroidX package structure to make it clearer which packages are bundled with the5# Android operating system, and which are packaged with your app"s APK6# https://developer.android.com/topic/libraries/support-library/androidx-rn7android.useAndroidX=true8# Automatically convert third-party libraries to use AndroidX9android.enableJetifier=true10PSTK_PUBLIC_KEY="pk_test_xxxx"
I added my public key in my gradle.properties file because I don't track this file with version control. But feel free to use other methods you deem fit. I referenced the public key variable in my app's build.gradle file:
1defaultConfig {2 // other configuration3 ...4 buildConfigField("String", "PSTK_PUBLIC_KEY", PSTK_PUBLIC_KEY)5}
Enable Internet Permission
Our app will need internet access to send our payment request, so we'll need to add the required permission. Open your AndroidManifest.xml file and add the permission:
1<?xml version="1.0" encoding="utf-8"?>2<manifest xmlns:android="http://schemas.android.com/apk/res/android"3 package="com.paystack.foodcheckout">45 <uses-permission android:name="android.permission.INTERNET" />67 <application>8 ...9 </application>1011</manifest>
Integrate Paystack SDK
Let's open the CheckoutActivity which will contain the code to handle our card payment. We'll be creating four functions to handle different aspects of our integration:
Initialize Paystack
This function is used to initialize the SDK:
- Java
- Kotlin
1private void initializePaystack() {2 PaystackSdk.initialize(getApplicationContext());3 PaystackSdk.setPublicKey(BuildConfig.PSTK_PUBLIC_KEY);4}5
Initialize Form Variable
This function is used to initialize the form element:
- Java
- Kotlin
1public class CheckoutActivity extends AppCompatActivity {23 private TextInputLayout mCardNumber;4 private TextInputLayout mCardExpiry;5 private TextInputLayout mCardCVV;67 @Override8 protected void onCreate(Bundle savedInstanceState) { ... }910 private void initializeFormVariables() {11 mCardNumber = findViewById(R.id.til_card_number);12 mCardExpiry = findViewById(R.id.til_card_expiry);13 mCardCVV = findViewById(R.id.til_card_cvv);1415 // this is used to add a forward slash (/) between the cards expiry month16 // and year (11/21). After the month is entered, a forward slash is added17 // before the year1819 Objects.requireNonNull(mCardExpiry.getEditText()).addTextChangedListener(new TextWatcher() {20 @Override21 public void beforeTextChanged(CharSequence s, int start, int count, int after) {2223 }2425 @Override26 public void onTextChanged(CharSequence s, int start, int before, int count) {2728 }2930 @Override31 public void afterTextChanged(Editable s) {32 if(s.toString().length() == 2 && !s.toString().contains("/")) {33 s.append("/");34 }35 }36 });3738 Button button = findViewById(R.id.btn_make_payment);39 button.setOnClickListener(v -> performCharge());40 }41}42
Perform Charge
This is the function that parses payment details and initiates the payment:
- Java
- Kotlin
1public class CheckoutActivity extends AppCompatActivity {23 // ...45 @Override6 protected void onCreate(Bundle savedInstanceState) { ... }78 private void initializeFormVariables() { ... }910 private void performCharge() {11 Intent intent = getIntent();1213 String cardNumber = mCardNumber.getEditText().getText().toString();14 String cardExpiry = mCardExpiry.getEditText().getText().toString();15 String cvv = mCardCVV.getEditText().getText().toString();1617 String[] cardExpiryArray = cardExpiry.split("/");18 int expiryMonth = Integer.parseInt(cardExpiryArray[0]);19 int expiryYear = Integer.parseInt(cardExpiryArray[1]);20 int amount = intent.getIntExtra(getString(R.string.meal_name), 0);21 amount *= 100;2223 Card card = new Card(cardNumber, expiryMonth, expiryYear, cvv);2425 Charge charge = new Charge();26 charge.setAmount(amount);27 charge.setEmail("customer@email.com");28 charge.setCard(card);2930 PaystackSdk.chargeCard(this, charge, new Paystack.TransactionCallback() {31 @Override32 public void onSuccess(Transaction transaction) {33 parseResponse(transaction.getReference());34 }3536 @Override37 public void beforeValidate(Transaction transaction) {38 Log.d("Main Activity", "beforeValidate: " + transaction.getReference());39 }4041 @Override42 public void onError(Throwable error, Transaction transaction) {43 Log.d("Main Activity", "onError: " + error.getLocalizedMessage());44 Log.d("Main Activity", "onError: " + error);45 }4647 });48 }49}50
Let's break down the code to understand how it works:
- Java
- Kotlin
1Intent intent = getIntent();23String cardNumber = mCardNumber.getEditText().getText().toString();4String cardExpiry = mCardExpiry.getEditText().getText().toString();5String cvv = mCardCVV.getEditText().getText().toString();67String[] cardExpiryArray = cardExpiry.split("/");8int expiryMonth = Integer.parseInt(cardExpiryArray[0]);9int expiryYear = Integer.parseInt(cardExpiryArray[1]);10int amount = intent.getIntExtra(getString(R.string.meal_name), 0);11amount *= 100; // convert amount to kobo12
This code snippet fetches the card details from the checkout form and parses it. The SDK has methods for validating card details before charging a card. We also fetched the amount passed from the MainActivity using Intent and converted it to kobo.
Amount Denomination
All amount sent to Paystack must be in the subunit of the supported currency
After getting all the payment details, we can then initiate a payment request:
- Java
- Kotlin
1Card card = new Card(cardNumber, expiryMonth, expiryYear, cvv);23Charge charge = new Charge();4charge.setAmount(amount);5charge.setEmail("customer@email.com");6charge.setCard(card);78PaystackSdk.chargeCard(this, charge, new Paystack.TransactionCallback() {9 @Override10 public void onSuccess(Transaction transaction) {11 parseResponse(transaction.getReference());12 }1314 @Override15 public void beforeValidate(Transaction transaction) {16 Log.d("Main Activity", "beforeValidate: " + transaction.getReference());17 }1819 @Override20 public void onError(Throwable error, Transaction transaction) {21 Log.d("Main Activity", "onError: " + error.getLocalizedMessage());22 Log.d("Main Activity", "onError: " + error);23 }2425});26
We need to first create a card instance that will be used as one of the parameters for our Charge instance. The Charge object takes an amount, email, and card as required parameters. The SDK then takes the Charge as a required parameter in the chargeCard method to make payment. The chargeCard also takes an object with three callback methods:
- onSuccess: This is called when the payment is successful.
- beforeValidate: This is called when OTP or bank authentication is about to start.
- onError: This is called when the payment fails.
Parse Response
This method is called when a payment is successful. It parses the response and displays a toast with the transaction reference:
- Java
- Kotlin
1private void parseResponse(String transactionReference) {2 String message = "Payment Successful - " + transactionReference;3 Toast.makeText(this, message, Toast.LENGTH_LONG).show();4}5
Link 'em All
We'll link everything up in our onCreate method:
- Java
- Kotlin
1@Override2protected void onCreate(Bundle savedInstanceState) {3 super.onCreate(savedInstanceState);4 setContentView(R.layout.activity_checkout);56 // add these lines7 initializePaystack();8 initializeFormVariables();9}10
Test Integration
We can now test our app to ensure it works as expected. We have a couple of test cards that can be used to simulate different payment scenarios.
Confirm Payment
Note
You should always confirm a payment before delivering services to your customer.
This section assumes that you have a backend server that your mobile app rides on. You need to listen for events using your webhook URL.
Webhooks allow Paystack to send you events that occur on your integration in real-time. When a payment is successful, we'll send a charge.success event to your webhook URL that will contain information about the successful transaction. It's recommended that you listen for this event to confirm a payment. This method of transaction confirmation is more resilient when a customer has connectivity issues and when there's a delay from payment processors.
Alternatively, you can send the transaction reference from the app to your backend server. Then, from your server, you can call our verify transactionAPI endpoint with the transaction reference. The response body will contain a status field that indicates whether or not the transaction was successful.
Recurring Payments
When a transaction is confirmed, the response body will contain an authorization object:
1{2 ...3 "data": {4 ...5 "authorization": {6 "authorization_code":"AUTH_8dfhjjdt",7 "card_type":"visa",8 "last4":"1381",9 "exp_month":"08",10 "exp_year":"2018",11 "bin":"412345",12 "bank":"TEST BANK",13 "channel":"card",14 "signature": "SIG_idyuhgd87dUYSHO92D",15 "reusable":true,16 "country_code":"NG"17 },18 ...19 }20}
When an authorization has a "reusable": true value, the customer's card can be used for recurring payment. You can store the authorization_code and use it for subsequent payment.
The source code for this guide can be found in this repository. The main branch contains the Java code while the kotlin branch contains the Kotlin code. Cheers!