Push Payment Requests
In a nutshell
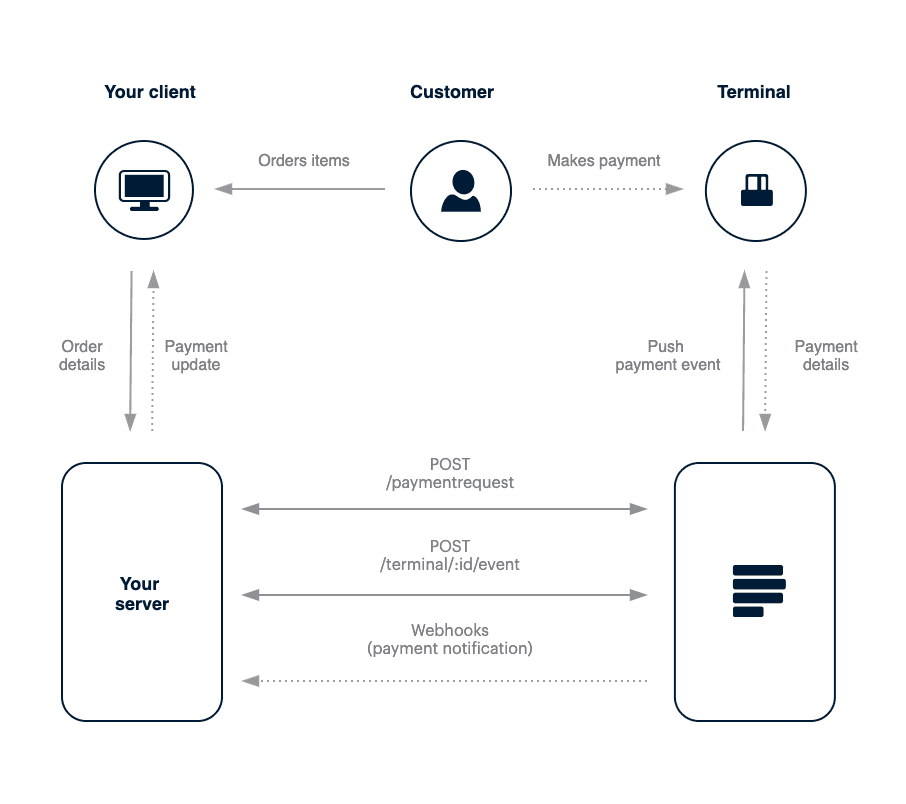
You can accept an in-person payment by initiating a payment request on your Point of Sale system, web, or mobile application and completing it on the Paystack Terminal
Introduction
Paystack Terminal allows you to bridge the gap between online and offline payments. You can create a payment request from the server powering your point of sales system, web, or mobile application and complete the payment offline using our Terminal.
The integration flow is a three-step process:
- Create a payment request
- Send the payment request to the Terminal
- Listen to payment notifications
Create a payment request
Prerequisite
This document focuses on sending payment to our Terminal. You can refer to how to Create an invoice to get a better understanding of payment requests
When a user has selected their items and is ready to make payment, you initiate a payment request from your application to our /paymentrequest endpoint:
1curl https://api.paystack.co/paymentrequest2-H "Authorization: Bearer YOUR_SECRET_KEY"3-H "Content-Type: application/json"4-d '{5 "customer": "CUS_5lgv9bc41uw15pb",6 "description": "Invoice for Damilola",7 "line_items": [8 { "name": "Pancakes and sausage", "amount": "2000", "quantity": 1 },9 { "name": "Chicken Salad", "amount": "3000", "quantity": 1 }10 ]11 }'12-X POST
1{2 "status": true,3 "message": "Payment request created",4 "data": {5 "id": 6304434,6 "integration": 463433,7 "domain": "live",8 "amount": 5000,9 "currency": "NGN",10 "due_date": "2021-05-18T00:00:00.000Z",11 "has_invoice": true,12 "invoice_number": 4,13 "description": "Invoice for Damilola",14 "line_items": [15 {16 "name": "Pancakes and sausage",17 "amount": "2000",18 "quantity": 119 },20 {21 "name": "Chicken Salad",22 "amount": "3000",23 "quantity": 124 }25 ],26 "tax": [],27 "request_code": "PRQ_kwahak3i05nt1ds",28 "status": "pending",29 "paid": false,30 "metadata": null,31 "notifications": [],32 "offline_reference": "4634336304434",33 "customer": 28958104,34 "created_at": "2021-05-17T14:48:53.269Z"35 }36}
The id and offline_reference are needed in the next step. You should store both parameters as they will be used in the coming sections.
Check terminal status
Optionally, before you push a payment request to a terminal, you might want to check if the terminal is online and available to receive requests. You can make a request to the Terminal StatusAPI to check the status of the terminal:
1curl https://api.paystack.co/terminal/:id/presence2-H "Authorization: Bearer YOUR_SECRET_KEY"3-X GET4
1{2 "status": true,3 "message": "Terminal status retrieved",4 "data": {5 "online": true,6 "available": true7 }8}
The terminal is ready to receive requests if both online: true and available: true. If either param is false, kindly ensure the terminal isn't being used to process a payment.
Push to terminal
Paystack Terminal can receive and process a payment request sent from the merchant's server, allowing developers to build delightful in-person experiences.
In order to complete a payment request on the terminal, you need to make a request to the Terminal EventAPI, passing the id and offline_reference
of a previously created payment request:
1curl https://api.paystack.co/terminal/:terminal_id/event2-H "Authorization: Bearer YOUR_SECRET_KEY"3-H "Content-Type: application/json"4-d '{5 "type": "invoice",6 "action": "process",7 "data": {8 "id": 7895939,9 "reference": 463433789593910 }11 }'12-X POST
1{2 "status": true,3 "message": "Event sent to Terminal",4 "data": {5 "id": "616d721e8c5cd40a0cdd54a6"6 }7}
Verify event delivery
When you push to the terminal, a successful response indicates that the push request has successfully been received by our servers and has been forwarded to the terminal. It doesn't necessarily mean that the request was successfully received by the device.
To confirm that the terminal received the event, you can make a request to the Terminal Event StatusAPI:
1curl https://api.paystack.co/terminal/:terminal_id/event/:event_id2-H "Authorization: Bearer YOUR_SECRET_KEY"3-X GET
1{2 "status": true,3 "message": "Message Status Retrieved",4 "data": {5 "delivered": true6 }7}
When a terminal receives the payment request, it displays the payment request details for the customer to review and make payment.
Event delivery confirmation
You can only confirm that a device received an event within 48 hours from the request initiation
Listen to notifications
Receiving Notifications
In order to receive notifications, you need to implement a webhook URL and set the webhook URL on your Paystack Dashboard
When payment is made for an invoice, we send an update to your server using webhooks. On your webhook URL, you should listen to these events:
| Event | Description |
|---|---|
charge.success | This is sent when the customer successfully makes a payment. It contains the transaction, customer, and card details. |
paymentrequest.success | This is also sent to indicate a successful payment for an invoice. It contains the invoice details. |
paymentrequest.pending | This is sent when the payment request is successfully created. |
invoice.payment_failed | This is sent when the payment for the invoice failed. |
- Transaction Successful
- Payment Request Successful
- Payment Request Pending
- Invoice Failed
1{2 "event": "charge.success",3 "data": {4 "id": 1259864309,5 "domain": "live",6 "status": "success",7 "reference": "pos_wtwyrj7n6x",8 "amount": "5000",9 "message": "Payment Made",10 "gateway_response": "Approved or completed successfully",11 "paid_at": "2021-11-04T16:32:33.000Z",12 "created_at": "2021-11-04T16:32:04.000Z",13 "channel": "pos",14 "currency": "NGN",15 "ip_address": "35.178.254.191, 172.70.162.115",16 "metadata": 0,17 "log": null,18 "fees": null,19 "fees_split": null,20 "authorization": {21 "exp_month": null,22 "exp_year": null,23 "account_name": null,24 "receiver_bank_account_number": null,25 "receiver_bank": null26 },27 "customer": {28 "id": 180059003,29 "first_name": null,30 "last_name": null,31 "email": "pos_e3iesb-eh@email.com",32 "customer_code": "CUS_xztjqwng1kzwdbt",33 "phone": null,34 "metadata": null,35 "risk_action": "default",36 "international_format_phone": null37 },38 "plan": {},39 "subaccount": {},40 "split": {},41 "order_id": null,42 "paidAt": "2021-11-04T16:32:33.000Z",43 "requested_amount": "200",44 "pos_transaction_data": null,45 "source": {46 "type": "offline",47 "source": "pos",48 "entry_point": "pos_initialize",49 "identifier": "2232WE17"50 }51 }52}
Verifying a payment request manually
We'll send a webhook as soon as a transaction is completed. If your system is unavailable we'll keep retrying every hour for the next 72 hours. If you don't receive an event on your webhook URL after 72 hours, you can verify the invoice status either by using the Verify Payment RequestAPI or by checking the status directly on the dashboard.