Managing Transfers
In a nutshell
Integrate processes in your workflow to ensure you can send money securely and efficiently
Before sending money to your customers, you should put processes in place to ensure you have a robust integration. These processes ensure that money can be sent securely and without hassle.
Balance management
You can only send what you have. We run a balance check before creating a transfer request. If you don’t have sufficient funds (inclusive of fees), the transfer request would fail with a Your balance is not enough to fulfill this request message. You can set up an automation to fetch your Paystack balance before initiating a transfer request. To fetch your Paystack balance, make a GET request the check balanceAPIendpoint:
1#!/bin/sh2curl https://api.paystack.co/balance3-H "Authorization: Bearer YOUR_SECRET_KEY"4-X GET
1{2 "status": true,3 "message": "Balances retrieved",4 "data": [5 {6 "currency": "NGN",7 "balance": 29109717578 }9 ]10}
The data parameter in the response object is an array of objects. This is because you can have more than one currency on your integration.
Amount in subunits
Each balance parameter in the data array is the subunit of your currency. Depending on how you manage amount on your integration, you can either divide the balance by 100 or compare directly with your transfer amount which is already in the subunit.
OTP approval
As an additional layer of security, a Paystack business owner might want to confirm a transfer by using the One Time Password (OTP) sent to their device.
If you have
OTP enabled on your Paystack Dashboard and you intiate a transfer via the API, you get a response with message: Transfer requires OTP to continue and data.status: otp
- Response
1{2 "status": true,3 "message": "Transfer requires OTP to continue",4 "data": {5 "reference": "x8beye1xud",6 "integration": 463433,7 "domain": "test",8 "amount": 20000,9 "currency": "NGN",10 "source": "balance",11 "reason": "E choke",12 "recipient": 10751086,13 "status": "otp",14 "transfer_code": "TRF_1aqrqhoomp0rjro",15 "id": 56506855,16 "createdAt": "2021-04-07T12:41:57.763Z",17 "updatedAt": "2021-04-07T12:41:57.763Z"18 }19}
When the business owner supplies the OTP sent to their mobile number (and email if enabled), the transfer can be completed by using our Finalize TransferAPI endpoint:
1curl https://api.paystack.co/transfer/finalize_transfer2-H "Authorization: Bearer YOUR_SECRET_KEY"3-H "Content-Type: application/json"4-d '{ "transfer_code": "TRF_vsyqdmlzble3uii", "otp": "928783" }'5-X POST6
1{2 "status": true,3 "message": "Transfer has been queued",4 "data": {5 "reference": "on5hyz9poe",6 "integration": 428626,7 "domain": "test",8 "amount": 3794800,9 "currency": "NGN",10 "source": "balance",11 "reason": "Holiday Flexing",12 "recipient": 6788170,13 "status": "success",14 "transfer_code": "TRF_vsyqdmlzble3uii",15 "id": 23070321,16 "createdAt": "2020-05-13T14:22:49.687Z",17 "updatedAt": "2020-05-13T14:22:49.687Z"18 }19}
Server approval
OTP approval doesn’t allow you to build a fully automated system. However, this shouldn’t prevent you from confirming the authenticity of transfer requests. This is where the server approval comes in. It allows you to create a URL that checks that a transfer request was initiated by you. It’s a two step process:
- Create an approval URL
- Add URL to dashboard
Create an approval URL
The approval URL is a POST endpoint that checks the authenticity of transfer details. If the transfer details are authentic, it should respond with a 200, else a 400:
| Response code | Meaning | Status |
|---|---|---|
| 200 | Transfer approved | pending |
| 400 | Transfer rejected | rejected |
If the merchant server doesn’t respond within a few seconds, we mark the transfer as blocked and stop further processing.
Avoid long-running task
You should ensure your approval URL isn’t running long processes. This could lead to a delay in response time that causes transfers to get blocked.
- Node
- PHP
1// Using Express2function validateTransferRequest(request) {3 // validation logic4}56app.post('/approval', (req, res) => {7 const { body } = req8 const isValidTransferRequest = validateTransferRequest(body)910 if (!isValidTransferRequest) {11 return res.status(400).json({})12 }1314 return res.status(200).json({})15})
We add the payload used to initiate the transfer request when we send an approval request. When validating a request, your validation logic should confirm that the transfer reference and amount from the payload matches what you have on your system.
Add URL to dashboard
When you are done with the implementation of your approval URL, you need to add the URL to the Paystack Dashboard. To do this, head over the Paystack Dashboard, then navigate to Settings, then Preferences to locate the Transfer Approval section:
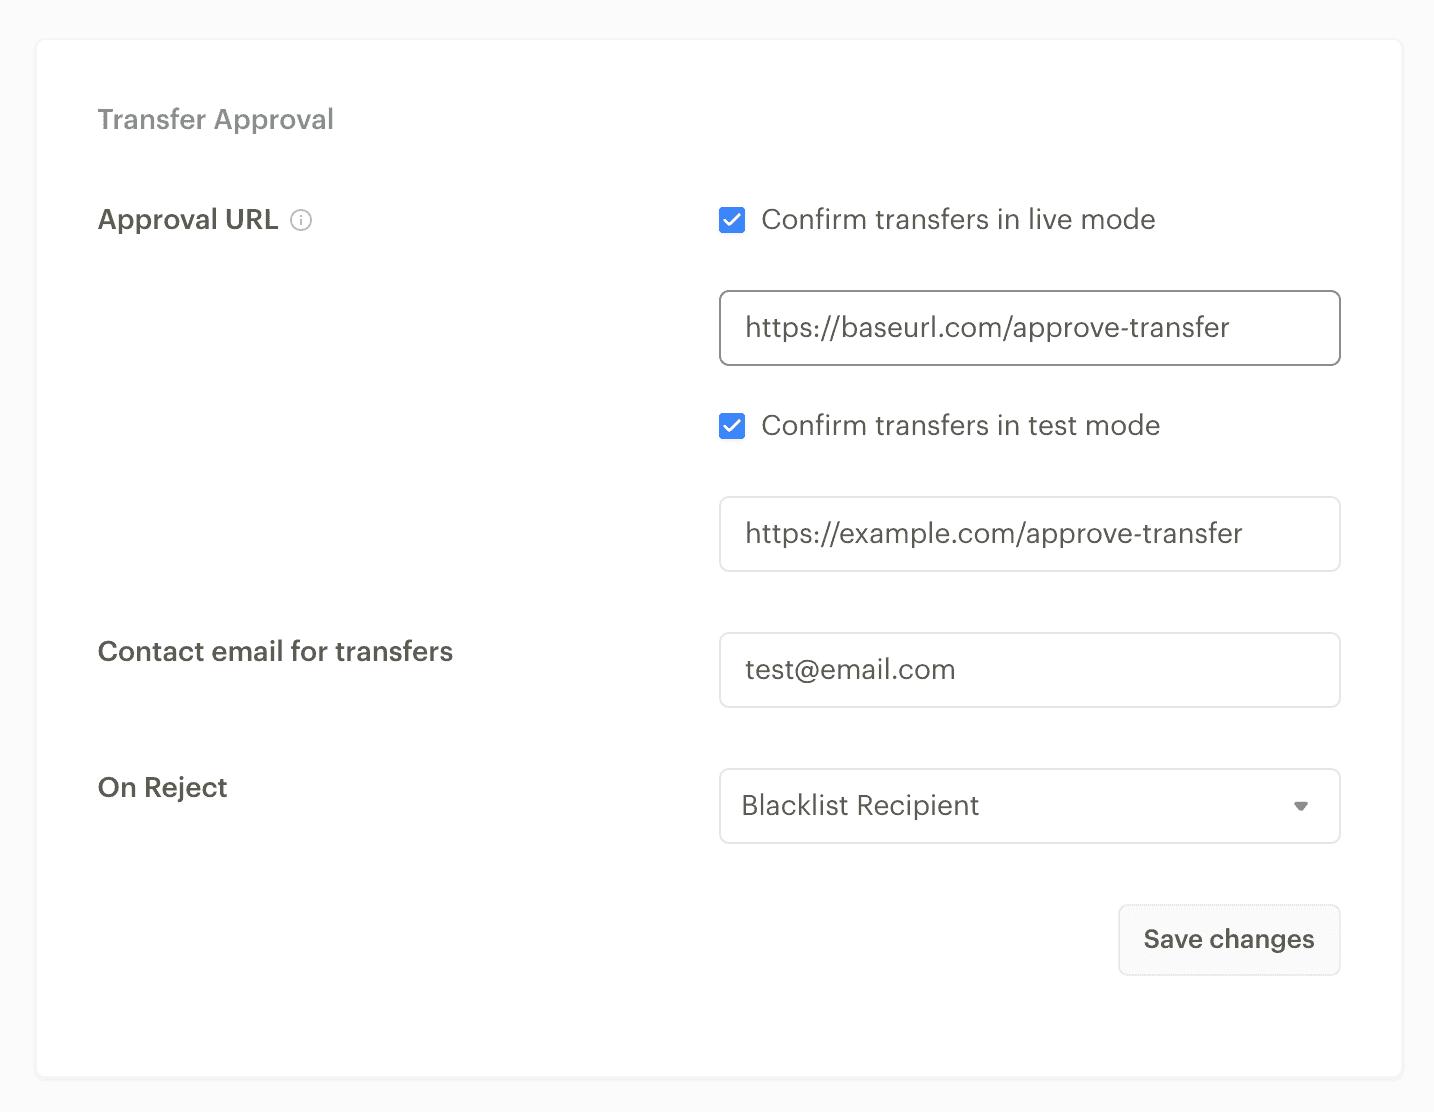
Save changes
Don’t forget to hit the Save changes button to finalize the setup process.
In the Transfer Approval section, check the box for the domain you want to activate the approval for, then add the URL for the domain. There are two actions available when you reject a request:
- Blacklist Recipient: When you blacklist a recipient, you would no longer be able to send money to the recipient. You can undo this from the Dashboard by navigating to the Recipients page, clicking on the recipient and toggling the switch.
- Do Nothing: We just won’t continue processing the request.